The Five Block Rocket Stove design and the text of this article first appeared in the PNZ Autumn 2010 Members Newsletter produced quartly for the members of Permaculture in New Zealand. As the author retains the rights to any article published it is republished here with minor changes for further dissemination and feedback
The
principles involved in the design of rocket stoves were invented in 1982 by Dr.
Larry Winiarski whilst he was Technical Director of the Aprovecho Research
Centre. His work is recorded in the Design Principles for Wood Burning Cook Stoves [1]
A
rocket stove is a simple to implement and highly efficient fuel combustion and
heat transfer design, utilised in the design of cooking appliances and space
heaters
A
typical rocket stove consists of a short chimney sitting on top of a fire
chamber with a front fire box. The external design and function of rocket
stoves varies considerably depending on their use as either: stoves, hot
plates, ovens, space heaters, static installations, mobile devices, etc. Designs
also vary considerably between manufactured and handmade stoves
My
interest in rocket stove design focused around its use as a stove, primarily
for base camp kitchen cooking during site work, courses, etc. My requirements
differed from those of the Koanga Institute team, who have implemented a static
rocket stove design in their course kitchen[2]
Generally
all stoves have similar characteristics: A firebox at the front base of the
rocket stove divided into separate air (bottom) and fuel (top) intakes which
allows fuel to be added above the air intake at the base of the chimney in the
fire chamber. Heat in the fire chamber rises in the chimney and cause a draft
at the fire box encouraging hot and efficient combustion of the fuel at high
temperatures. At the top of the chimney heat is focused directly on the
cooking/heating surface. Stoves designed in this way are very fuel efficient,
produce very little smoke and ensure optimum heat transfer efficiency from fuel
to food
My
design objective was to produce a simple stove based on rocket stove design
that fulfilled the following criteria:
- The design can be implemented by
anyone with access to the materials
- The design utilises actually
available and affordable materials
- The design requires the minimum
number of tools and addition inputs to implement
- The design is simple to construct,
use and maintain
- The construction can be broken down
and reassembled in different locations
- The construction can be quickly
built on spec
- The construction is ‘safe’
- The fuel must be accessible and
sustainable
- The design works as a component of
the larger design/philosophy
The
first stage of my project was research. I carried out an internet study, found
many interesting articles and designs and watched some inspirational YouTube
videos. I also began assessing what materials I would use to build the stove,
initially focusing on those used in the articles or videos of my research i.e.
purchased or recycled. The more I studied the less I knew and I had begun to
focus on details! At this point I moved my point of focus from the internet to
a review of both my criteria and what I was attempting to achieve, the sketch
pad and the physical modeling of ideas
During
my review I realised that I had not included the fact that this first design
implementation was only a test to see if I could make a rocket stove and assess
how they worked. The design did not need to be perfect, it just had to provide
the learning material to take me to the next level of design/complexity. Therefore
the cheaper and quicker I could make the stove the better. Through this design
analysis I realised that the hollow masonry/concrete block I have used in my pottage
garden layout would be the ideal resource to construct the stove
My
initial block stove layouts and models were large, cumbersome and obviously
dysfunctional! The wonderful thing about blocks of any sort is that they can be
assembled and reassembled in many different ways, and the more I handled the
blocks and became familiar with their characteristics the better I utilised
their features and the leaner the design sketches and models became. I finally
settled on a minimalistic five block model, which fulfilled my design criteria,
and I arranged to build and test the design
I
originally intended to test the stove on the beach, where I collected the fuel
twigs and sticks, but unfortunately this location and several others fell under
the personal revelation that you cannot just light fires anywhere you like.
Testing eventually took place at home!
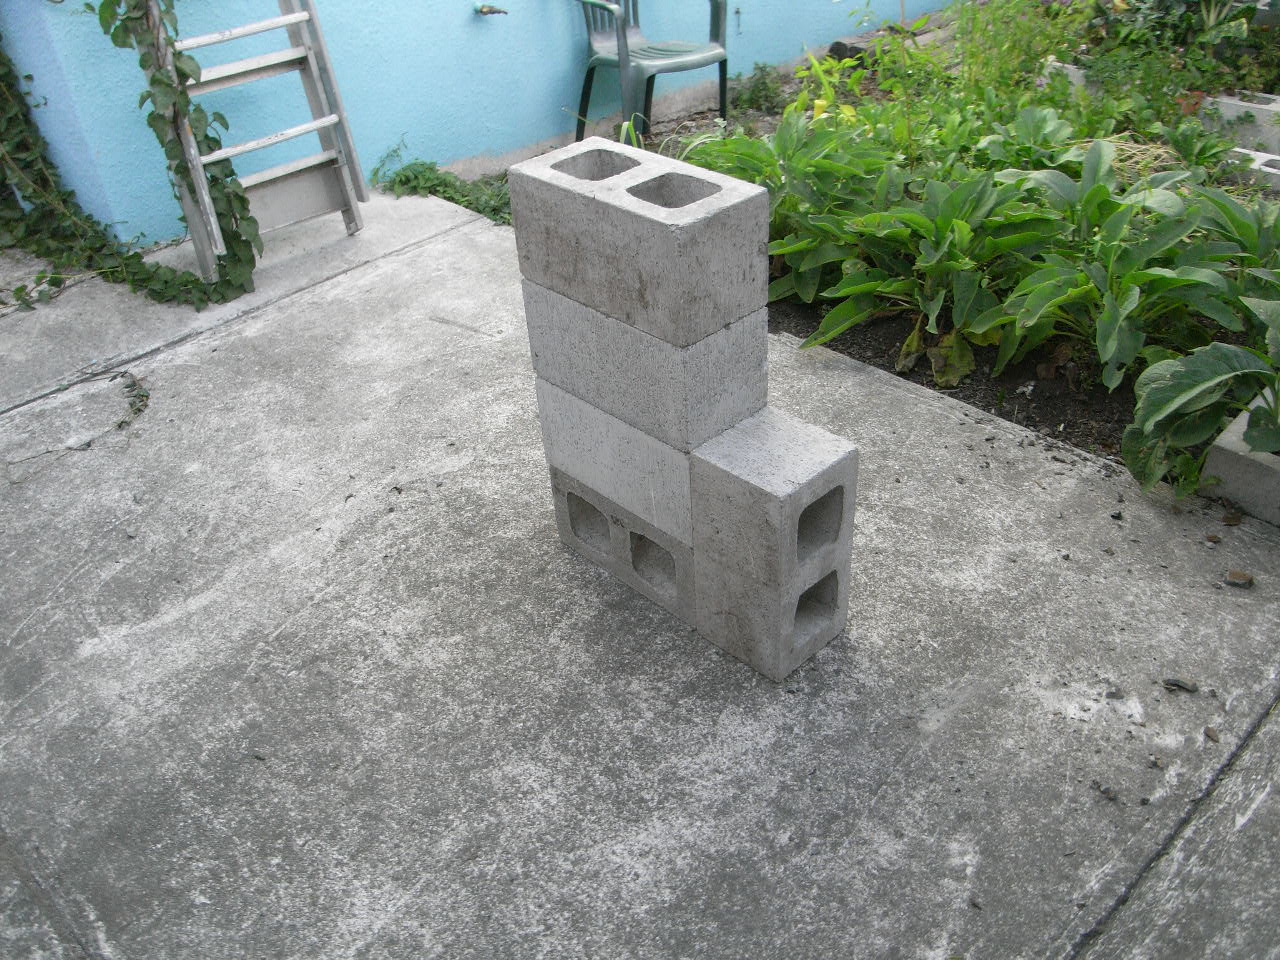
The
blocks were easy to position and assemble on a concrete base (See Figure 1.
Base block and chamber and Figure 2. Base block and fire chamber with chimney
blocks and fire box added to form five block rocket stove)
 |
| Figure 1. Base block and chamber |
|
|
|
 |
| Figure 2. Base block and fire chamber with chimney
blocks and fire box added to form five block rocket stove |
Once the blocks were
in position a fire was lit in the fire chamber a fire box divider added and
fuel added (See Figure 3. Lighting fuel viewed from fire box and Figure 4. Lighting fuel viewed from chimney, note
scale of fuel being used)
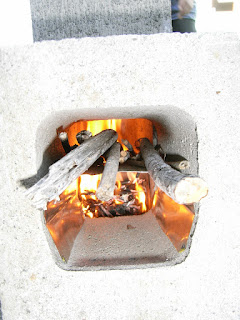 |
| Figure 3. Lighting fuel viewed from fire box |
 |
| Figure 4. Lighting fuel viewed from chimney, note
scale of fuel being used |
Once
the fire was set I was able to heat a tin of baked beans from opening to
serving in five minutes (See Figure 5. Baked beans cooking on the stove) and boil 2 litres of water in the thermette in less
than seven minutes (Figure 6. Thermette boiling over
on the rocket stove chimney)
 |
| Figure 5. Baked beans cooking on the stove |
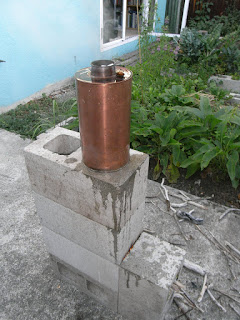 |
| Figure 6. Thermette boiling over
on the rocket stove chimney |
Following practical tests the
temperature at the chimney exit was measured to be in excess of 300 Deg C the maximum range of my thermometer
Overall,
my five block rocket stove design was successful in allowing me to cook and
heat water quickly with very little fuel. I have now added it unchanged to my
base camp kitchen equipment, along with the thermette, a smoker and a cob ove - which will cover any cooking/kitchen requirements with fuel that I can grow
myself in the form of coppice. I have no doubt that once installed in situ
design modifications could increase the efficiency further. The
design fulfils all of my criteria and several friends plan to implement
identical designs. Further pictures and notes can be found on the following public
album[3]
Notes:
- To
be close fitting and stable the designed stove needs to be constructed on
firm level ground.
- Although
the thermette boiled quickly and fiercely, its conical chimney shape did reduce
the draft into the
chimney. When the thermette was removed, flames literally jumped out of the
chimney as the pressure
changed.
- In
a semi permanent installation the chimney could be clay lined and the whole
stove insulated
- The
draft in the chimney could be improved by removing the cavity mould taper of
the block to create parallel sides for the chimney
- Replace
the tin can sheet divider with a piece of suitable
steel. Design
sketches and more photos and details can be found on my Picasa online albums
page created during
the project[3]
- http://www.rocketstove.org/images/stories/design-principles-for-wood-burning-cook-stoves.pdf
- Koanga Institute Rocket Oven! Permanent Wall Mounted Kitchen Oven
- https://goo.gl/photos/pjhMyh8pGJa6MQfg6
Rocket Stove Materials:
- *4
standard plain end concrete block 390*140*190
- *1
standard open end block 390*140*190
- *1
large tin can sheet to make firebox divider
- *1
small oven rack to act as post stand above chimney
- *
Lots of small twigs/sticks for fuel
- A
small helper to keep the fire stoked is helpful!
Chew